
Pressure Cooker Chinese Take Out Sweet ‘N Sour Chicken will cure your cravings for cheap Strip Mall $1.00 an item Chinese Food.

Pressure Cooker Chinese Take-Out Sweet ‘N Sour Chicken
Do you remember those $1.00 Chinese Restaurants in the strip malls all over the place? You walk in to the restaurant and the people behind the counter, are holding up toothpicks with a sampling of some type of a chicken nugget?
The food is usually fast moving and really, for a buck, not too bad. Well, think of this recipe kind of like that.

Cast of Ingredients for Pressure Cooker Sweet & Sour Chicken
The ingredient list is short. This is not an authentic Chinese recipe. It’s just a quick and easy Pressure Cooker Chinese Take Out Sweet ‘N Sour Chicken recipe to help you get through your Fast Food ‘Chinese Food’ cravings.

Air Fryer New York Style Egg Rolls w/ Sweet ‘N Sour Sauce
Think about starting out your meal with some Air Fryer New York Style Egg Rolls. They are simple to make and taste like they came from a good New York Chinese Restaurant.
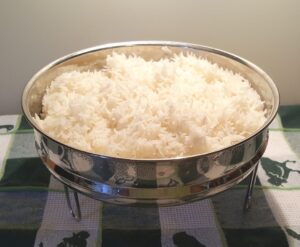
Pressure Cooker Perfectly Cooked Pot In Pot Rice
Turn this Pressure Cooker Chinese Take Out Sweet ‘N Sour Chicken recipe into a one pot meal!

Whisk up the Sauce
Whisk up the Sweet ‘N Sour Sauce and put it aside. After browning the chicken a bit, we’ll add it to the pot and have it cook together with the chicken.

Mix together Potato Starch and Seasonings
In a medium mixing bowl, add the Potato Starch and all the seasonings. I like to add a sprinkle of Chinese Five Spice to the Potato Starch. It adds a bit of authenticity, even though this is not a proper Chinese recipe. Whisk the dry ingredients together.

Coat the Chicken in Potato Starch
Before starting to dredge the chicken, turn on your Pressure Cooker and allow it to heat completely. Use the Sauté, Browning or Meat button, whichever you have on your model. When you allow a stainless steel pot to get hot, before adding a fat, this will help to make the pot non stick.
Add the chicken pieces to the Potato Starch mixture. Using tongs, not your fingers…trust me, you don’t want to use your fingers, they will become a gloppy mess, dredge the chicken in the Potato Starch mixture and make sure all pieces are covered.

Dip Chicken into Egg Mixture
Shake off excess Potato Starch and dip the chicken pieces into the egg mixture.

Coat all Chicken with Egg
While you are prepping the chicken, select Sauté, Browning or Meat on your Pressure Cooker and allow to fully heat, before adding your fat/oil. Doing so, will help to make a stainless steel pot, non stick.

Give the Chicken a Quick Sear
Add the oil to your cooking pot. Using your tongs and in batches, shake off excess egg and carefully place chicken pieces into the Pressure Cooker cooking pot and sear the chicken on all sides. This will give a little protection to the chicken and keep it from getting dry and rubbery.

Brown all of the Chicken and set aside
Remove the chicken to a dish and repeat the process, until all the chicken has a light sear and is well protected from the dreaded demons of the dry and rubbery pressure cooker chicken. The chicken will puff up a bit.

Deglaze the Pot
There shouldn’t be much, if anything stuck in the cooking pot. It is important to shake off any excess Potato Starch and then the egg prior to placing the chicken into the cooking pot. However, the water and deglazing will undo any issue that may arise. 🙂 So, add in the water and deglaze the pot. This will also cool down the pot a bit, so that you won’t have any scorching after the sauce is added.

Pour in the Sauce and Whisk it with the Water
Pour in the Sweet ‘N Sour Sauce and Whisk it with the Water to combine. Make sure nothing is stuck on the bottom of your cooking pot. If you prefer an Orange flavor, please try my Pressure Cooker Chinese Orange Pepper Chicken for a one pot meal.

Carefully add the Chicken into the Sauce and Mix
Very carefully, place all the chicken into the Sweet ‘N Sour Sauce and mix together. If you want to make your rice at the same time, using the Pot in Pot method, now is the time to add your Trivet and pan of rice.

Remove Chicken and Thicken Sauce
A Sweet ‘N Sour Sauce should not be super thick, but it is not runny like water either. It needs to be thick enough, just to stick to the chicken. After removing the chicken from your Pressure Cooker, use the Sauté, Browning or Meat button on your Pressure Cooker and cook down the sauce a bit. This will only take a minute or two, so keep your eye on the Sauce.

Pressure Cooker Chinese Take Out Sweet ‘N Sour Chicken
Serve your Pressure Cooker Chinese Take Out Sweet ‘N Sour Chicken with Pressure Cooker Perfectly Cooked Pot in Pot Rice. If you like Chinese Take-Out, please try my Pressure Cooker Chinese Take-Out Beef and Broccoli.
Kitchen Equipment and Essentials
- Instant Pot DUO 6 Quart
- J.A. Henckels Classic 7-inch Hollow Edge Santoku Knife
- Amco Advanced Performance 18/10 Stainless Steel Measuring Spoons
- Simply Gourmet (Dry) Stainless Steel Measuring Cups
- Anchor Hocking Glass (Liquid) Measuring Cups
- Rösle Stainless Steel Flat Whisk– a MUST have, probably my most used utensil
- Rachael Ray Stoneware EVOO Oil Dispensing Bottle
- Porcelain & Bamboo Salt Box with Spoon
- stainless steel flat bottomed insert pans or stainless steel flat bottomed insert pan for Pot in Pot Rice and Desserts
- Stainless Steel Tall Legged Trivet
- 3.5 Quart Stainless Steel Mixing Bowl
Caring is sharing! If you would like to support This Old Gal, please share this recipe on Social Media, so that I can continue to bring you more wonderful recipes!
Here is the handy printable recipe:

Pressure Cooker Chinese Take-Out Sweet 'N Sour Chicken
Print Pin Save RateIngredients
- 2 pounds Chicken Breat boneless/skinless
- 1 cup Potato Starch (or more if needed)
- 1/2 teaspoon Sea Salt
- 1/2 teaspoon Freshly Ground Black Pepper
- 1/16 teaspoon Chinese Five Spice optional
- 1/4 cup Vegetable Oil or Olive Oil
- 1/2 cup Fresh Water
- 2 large Eggs optional
Sauce
- 3/4 cup White Sugar
- 1/2 cup Ketchup
- 3/4 cup Apple Cider Vinegar
- 1/4 cup Soy Sauce, Low Sodium
- 2 cloves Fresh Garlic minced
- 1/2 cup Fresh Water
Instructions
- Trim fat from chicken and cut into bite size pieces.
- In a medium mixing bowl, add Potato Starch, Chinese Five Spice, Salt and Pepper and combine. Add Chicken to Potato Starch and coat well. Dip chicken into the egg mixture and set aside.
- Select Saute, Browning or other button on your Pressure Cooker and allow pot to fully heat.
- Add oil to the cooking pot. Using tongs, pick up Chicken pieces, shake off excess Egg and place into Pressure Cooker cooking pot, being careful not to crowd chicken. Sear Chicken on all sides and remove to a plate. Repeat, until all Chicken has been seared and puffy.
- Add water and deglaze pot. Add in sauce and whisk together. Carefully place Chicken into sauce.
- If making this a One Pot Meal, add the Prepared PIP Rice now.
- Lock on lid and close Pressure Valve. Cook at High Pressure for 3 minutes. When Beep sounds, allow a 10 minute Natural Pressure Release.
- Remove lid. (Remove Rice and cover tightly to allow the rice to finish cooking) Remove Chicken to a bowl. If desired, simmer sauce until thick.
Notes
PIN this Pressure Cooker Chinese Take Out Sweet ‘N Sour Chicken {Instant Pot}!

Pressure Cooker Chinese Take Out Sweet ‘N Sour Chicken {Instant Pot}

This was a big hit!! Everyone loved it.
Thank you, Gigi! Jill
Made this tonight used cornflour as potato starch not readily available
Lovely although I will adapt resize for my taste – less cider vinegar and replace for pineapple juice oukdnt believe how crispy chicken was _
Thanks for this x
Thank you, Vicky. Jill
Hi I am interested in making this with pork as it seems to be similar to a recipe that my dad talks about when his mom used to make it in their stove top pressure cooker. Unfortunately he doesn’t have the recipe. I really would need to double it though to make enough for a family dinner. If I doubled it, would I need to adjust the cooking time at all? Thanks!
I made this with pork tenderloin cut into chunks because that’s what I had. I kept the cook time the same and it was amazing.
My husband and I both enjoyed this recipe, but I have a couple of questions so, hopefully, it will be even better next time. The recipe mentions an egg “mixture” but all you do is beat the eggs — correct? Also, my chicken was very tender but definitely not crispy. An earlier comment mentioned that the chicken was crispy even after being in the fridge, but I don’t see how chicken cooked under pressure in sauce can turn out crispy.
That’s my question too! I guess I’ll just beat eggs too.
Hi there! Could I add vegetables (broccoli, carrots) to this or would the be a mushy mess? Thanks so much!
The carrots would hold up, the broccoli would not, so I suggest mixing in the broccoli after pressure is released and let the residual heat cook the broccoli. Jill
This was amazing thank you!
Thank you, Becky. I am glad you enjoyed the recipe. Jill
This looks delicious! I was wondering if cubed pork could be used as the protein as a change from chicken (we eat a lot of chicken, LOL) and if so, should the cook time or anything else be adjusted?. Everyone in my house loves S&S pork. 🙂
Hi Carol. Pork is fine to use. Cook time would be a minute less. Jill
Thanks so much for the reply Jill, I can’t wait to try this!
Not sure what I did wrong but the chicken stuck horribly. I used potato starch and egg. I waited until the IP said HOT, before I added the oil. I ended up letting the pot cool, then I washed it because all the breading was stuck to the bottom of the pot. I also added some ginger, broccoli, pineapple, onion, celery, and peppers. The chicken turned out very tasty and tender. I added the veg with the sauce, and, as expected, everything turned out a bit over-cooked. Next time, I’ll saute the veg, remove it from the pot, and add it back in after the chicken is done and I’m reducing the sauce. I hope to solve the sticking problem, and make this again.
Tom. I am glad you enjoyed this and sorry about the sticking. I’m wondering if you did not shake off the excess starch before putting the chicken into the pot. Also, deglazing is very important. Please let me know how you do the next time you make this dish. Jill
i have a recipe similar to this but it uses the oven. I add green pepper and onion chunks and pineapple chunks. How will this affect cooking in Instant Pot?
Hi Melissa. There shouldn’t be any issue. Jill
This is fast becoming a fav in our home! We used boneless skinless chicken thighs. The meat came out super tender. We also added fresh ginger to the sauce. Thank you for this recipe !
Fresh ginger is a wonderful addition. Glad you enjoyed. Jill
For those that mentioned it retained some crispness how did you cook it? Mine did not. I did not use the full amount of chicken and I used corn starch v potato starch. It was still great. I just might not bother with pre cooking next time.
I love this recipe! The only changes I make is that I use cornstarch and I usually make 1 or 1.5 pounds of chicken. It’s plenty for 4-5 large servings and we like extra sauce for rice.
How tall is your trivet
Hi Sharon, the one I use is almost 3 inches. Here is a link for taller trivets. https://staging.thisoldgal.com/product/B01N1FYSZ8/US/tog00-20/ Jill
This looks fabulous but I’d like to try it with cauliflower instead of chicken since our family is vegetarian. Would you recommend a shorter cooking time? I’ve successfully used cauliflower often for regular recipes for things like General Tso’s chicken and it’s really good, but I think that would pulverize the cauliflower in an IP for that long. We are also a gluten free family and I was happy to see this uses potato starch, which I always have a ton of and I don’t need to convert that part. 🙂 What would you suggest for a cooking time if I use cauliflower, or do you think it wouldn’t work? Thanks!
I was looking forward to making this, but do not have potato starch. Could I use corn starch in place of the potato starch? How much would it alter the final results of the recipe?
I’m wondering the same!
Yes. I used corn starch. It was just fine. I couldn’t find potato starch so used what I had
I made this tonight. I happened to have everything again. It has a wonderful flavor. Even my husband that is not a fan of Sweet and Sour loved it. I thought it was going to be over sweet with all the sugar and it wasn’t. I did use egg and needed more potato starch.
Hi Cheryl~
I am thrilled you enjoyed this recipe. Thank you so much for letting me know. I didn’t think people would want to do the extra work of the egg, but now that I know you did, I will go and up the potato starch in the recipe/
Jill
I thought using the egg would make it puff up more. Chicken pieces were still crispy after being in the fridge. Looking forward to leftovers.